
While we were all busy with the holidays, Dick, W3OA was producing the next-generation Aggregator. We think you’ll agree that it is a real improvement. With this Aggregator, you’ll be able to automate changes in which bands you’re covering, and make different choices for contests and regular operating. If you’re troubled by sending busted spots due to local RFI or other causes, you can cull these out with the new Bad Call filter. All the features of the Aggregator are now arranged on tabs, to make the program easier to use.
First, the easy part. Simply download Aggregator 2.0 from the RBN web site. If this is your first venture into a Windows Aggregator, you will want to check out the RBN Blog for more information on a first-time installation.
Save the file where you want it to live. It must be on the same machine as Skimmer or SkimServ for the band changing feature to work, but there’s no installation, nothing. The only restriction is that users of Windows Vista and Windows 7 will need to put the new Aggregator somewhere that it can write an .ini file. That means putting it almost anywhere but the Program Files directory - many of us use C:\Ham Radio as an alternate location, to avoid these issues. For whatever it’s worth, I just put Aggregator 2.0 in my SkimSrv directory. Don't try to run it from a Download page in your browser - generally that won't work.
OK, now start it up.
If you are currently using an earlier version of the Windows Aggregator, you can just skip to the portion of Section 3 that discusses the Bad Call filter and then continue to Section 4, which discusses the scheduled rotation of SkimSrv.ini files. Otherwise, follow along and we’ll tell you how to set up the Aggregator to connect your Skimmer or SkimSrv to the Reverse Beacon Network.
1. Initial Setup
You’ll see this screen the first time you start the new Aggregator.

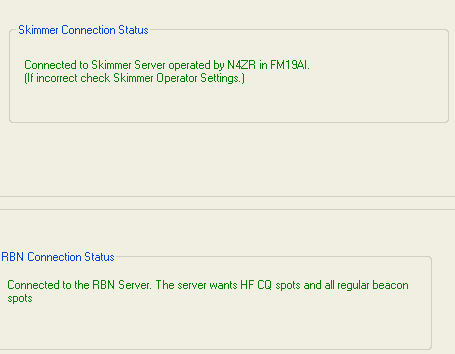
Zooming in…

The left-hand side is the setup for connecting the Aggregator to your Skimmer or Skimmer Server. Unless you have set up the Telnet server in your Skimmer/SkimSrv to require a callsign or password, you can simply leave the first two boxes “as is”. For the IP address, if your Aggregator is on the same machine as your Skimmer/SkimSrv, leave “127.0.0.1”. Otherwise, enter the internal IP address of the machine where it is. Similarly, the port will normally default to 7300, unless you have changed it in Skimmer/SkimSrv .
Now start Skimmer/SkimSrv and then click on the “Connect” button. If everything is OK, this is what you will see.

If anything is wrong, you’ll see these messages instead

The Aggregator waits for a good connection to Skimmer/SkimSrv before it tries to connect to the RBN server. In the meantime, it suggests the most common reason for the Aggregator’s failing to make contact with it.
At the bottom of the Connections tab, you’ll see a number of other options.

These are mostly self-explanatory. You would check the first one to hide your IP address on the list of Skimmers that appears on the RBN web site. I don’t particularly recommend doing this, particularly if you are using an off-site Skimmer, because in ARRL contests, at least, making an off-site Skimmer publicly available is one part of satisfying the sponsors that you are not trying to run a dedicated off-site Skimmer for nefarious reasons.
The second option is mainly for testing – for example, if you are sending a simulated spot stream to your Aggregator, you don’t want the simulated spots to find their way onto the RBN.
The third option is for users of transverters and similar devices. Normally you would leave it at the default 0 value.
Finally, at the bottom, in the frame captioned Local User, you are offered the option of setting up a local Telnet port to connect to a logging program. Effective with this release, this port requires a login, using a ham callsign. This was added for compatibility with the Telnet client in some loggers, which require a “login” challenge from a Telnet server before they will connect properly.
You can decide whether you want the Telnet port to send all spots, or only those that have been sent to the RBN server. As mentioned below, this choice will also determine what spots you see in the right-hand side of the Status tab.
2. The Status Tab
Click on the Status tab.

This screen brings forward information about the status of features on other tabs, all in one place. The most useful probably is the .ini Files frame at the bottom. It displays which CW segments are currently being covered by your Skimmer. In the case of SkimSrv, this is a combination of what bands are activated and what CW segments are set in the .ini file. Because these settings are received from the Skimmer/SkimSrv after it starts, you won’t see anything here until then.
Now let’s look at the right-hand side of the Status tab.

It looks the same as the previous version, and, as in version 1.4, you can select the spots you want to be displayed. You do this by your selection on the Connections tab. You can see only those actually sent to the RBN by the Aggregator, or all spots sent to the Aggregator by Skimmer. The caption at top left of the frame tells you which selection of spots is being viewed.
One important characteristic – if you have the Status window off-screen for any reason (minimized or replaced by another tab), and you return there, you’ll notice that the display of spots stopped when it went off-screen. Don’t worry – in a few seconds, when the next spot is sent to the Aggregator by Skimmer/Skimsrv, you’ll see it update to the current time. This does not mean that your spots were not being sent to the RBN during the off-time – they were –updating of the Status tab was simply suspended
3. The Spot Filter Tab

You’ll notice that whether or not you are using a master.scp file to filter the spots you’re sending to the RBN, the upper pane shows the file the Aggregator loaded locally (if any), and the file conveniently available for download from the RBN server.
The bottom panel lets you determine whether the Aggregator will use a master file or not. Frankly, we don’t think it is terribly useful to do so. The original intent was to screen out busted calls, but in fact the master file contains a great many of those, and also screens out a lot of new calls, as well as those of casual contesters. You could be throwing the baby out with the bath-water.
OK, so what is BadCalls.txt?
New with this Aggregator is the ability to create an affirmative list of calls that the Skimmer operator knows to be bad. Turn it on by checking the box, and then take a look at the right-hand side of this tab.

This one is pretty much self-explanatory. I typed “EN4ZR” in the scrolling box on the right, and then clicked on “Apply”. Once you have loaded everything that is in the box, the Apply button is greyed out until you add some more.
The second option is to edit the BadCalls.txt file, which can be found in the same folder as the Aggregator. Once you edit the file with Notepad or another plain text editor, you must manually load it into the Aggregator. That’s what the Load button is about.
The main target of this function is to block busted calls that are generated locally, due to RFI of one sort or another. Of course, you can put any call in the box, but there is some risk of accidentally blocking a real call. It would be too bad if you block a T6xx, only to find out that he really is in Afghanistan.
4. The .ini Files Tab
Now we’re getting to the main reason for this new release. For months, adding a way to change bands and/or CW segments in Skimmer Server (aka SkimSrv) has been high on our “to do” list. I wrote an AutoHotKey script some time ago to do this, to a limited degree, but it was a kludge and often not reliable.
This tab will let you select rotation schedules for normal operation and for contest weekends. with up to four scheduled changes per rotation. Why the difference? Because, during a major CW contest, competitors can be found on frequencies in and even above the normal RTTY allocations. In normal times, you might choose to exclude RTTY frequencies in order to reduce the number of bad spots resulting from Skimmer trying to decode RTTY, while during a big contest you would not want to miss stations CQing above, for example, 14070 KHz.
There is a lot going on here, so let’s start with the basics. SkimSrv uses a SkimSrv .ini file to store and load various parameters. In versions of Windows prior to Windows 7, this file is in the program directory; in Windows 7, it is found in an Applications Data subdirectory, as shown in the examples in the screen-shot above.
When you run Skimmer or SkimSrv without Aggregator, it goes looking for CW Skimmer.ini or SkimSrv.ini, and loads those settings. When you set up a rotation in Aggregator, as soon as Aggregator takes control, it over-writes the existing .ini file with whichever one you chose to use. For this reason, it is a good idea to stash a copy of your original .ini file somewhere other than where your Skimmer saves it so that it won’t be over-written.
Here’s an excerpt from the .ini file I am using, which I opened in Notepad.


Center Frequencies refer to the centers of the bands that are covered by SkimSrv, depending on whether you have selected 48, 96 or 192 KHz bandwidth. For example, on 80 meters, using 96 KHz bandwidth, the center frequency is 3545500 Hz, or 3545.5 KHz. The frequency coverage, then, is from 3500.0 to 3591 KHz (it’s not quite the full 96 KHz, for technical reasons). You can set these values to anything you want, or add additional ones, and SkimSrv will then display them as the choices you can make on the Skimmer tab.
In the example we’re using for this explanation, I created two special .ini files to allow me to watch the low bands during darkness and the high bands during daylight. I did this by setting SkimSrv up for the 7 low bands, closing the program (which re-writes the .ini file), and then renaming a copy of the SkimSrv.ini file to Low.ini. I then went back, re-opened SkimSrv with the default SkimSrv.ini file, repeated this process for High.ini, and could have done any number more the same way.
OK, now let’s look at the first panel.

The first thing you need to do here is to find your SkimSrv program file, using the Browse button, as in many other Windows programs. Once you have done this, and you start SkimSrv, this panel will display the CW segments being decoded under the current .ini file. You can use this to confirm that it is using the right .ini file for the current time of day. SkimSrv always starts from the file SkimSrv.ini.
Now the second panel.

This is where you set up your .ini file rotation. It will not actually begin working until you check Start Normal Rotation in the first panel. Assuming you have created the .ini files you want, you can browse to them in this panel, using the Browse buttons, and select them.
Once you have done that, you can test each .ini file by clicking on the Now button. When you click it, you’ll see all four buttons temporarily grey out. The Aggregator stops SkimSrv and re-starts it with the .ini file you have selected. This takes a few seconds, and you will probably see the Windows hourglass while it is happening.
You may also see an error message flash briefly, particularly if SkimSrv is on-screen. This is an artifact from SkimSrv, and will go away by itself. Then you will see the SkimSrv icon reappear in the Windows System Tray. The full name and path of the ini file to which you switched will appear in the first panel, and all four Now buttons will return to normal. The CW frequency bands covered by SkimSrv using the new .ini file will also be displayed.
To set up a scheduled rotation, set the time you wish to start using a given .ini file, using the Up/Down control to the left of the Now button. You can adjust the start time in 5-minute increments. Then check the “Active?” Button in the same row. Do this for each .ini file you want to use, and then click Start Normal Rotation in the first panel. If the Active? Box is unchecked, then the .ini file will not be used as part of the rotation.
When a rotation is started, the Aggregator checks the current time against the schedule you have set up, and adjusts the .ini file in use to agree with the schedule. In the example above, if you had used the Now button at 0100Z to start SkimSrv with the High.ini file, and then started rotation, the Aggregator would automatically switch to the Low.ini file.
Let’s look now at the last panel.

It is identical to the middle panel, except that its rotation is invoked by the Start Contest Rotation button, and both Rotation Buttons cannot be active at the same time. As mentioned above, the most likely use for this would be to set up additional ini files with extended CW Segments, for use during contests when there will be lots of CW activity in the RTTY segments and above.
5. Editing CW Segments
There’s no way to avoid some manual editing if you want to set up wider CW segments, because this parameter cannot be set from inside SkimSrv. Looking again at the .ini file, it’s pretty simple.


All you do edit the CwSegments line so that Skimmer will decode over the full frequency range you want. Of course, the actual coverage range depends on both the bandwidth chosen and the size of the CW segments, whichever is less. After you have made the edits you want, save the .ini file under a descriptive name like Contest Low.ini, and you’re done.
So that’s the story. I hope you enjoy the new capabilities. What would you like to see next?
No comments:
Post a Comment